Set up the Destiny Discover homepage
You can customize the Destiny Discover homepage to show the content and links you want to feature, in the order you want them to appear.
|
Notes:
|
You can customize the homepage as follows:
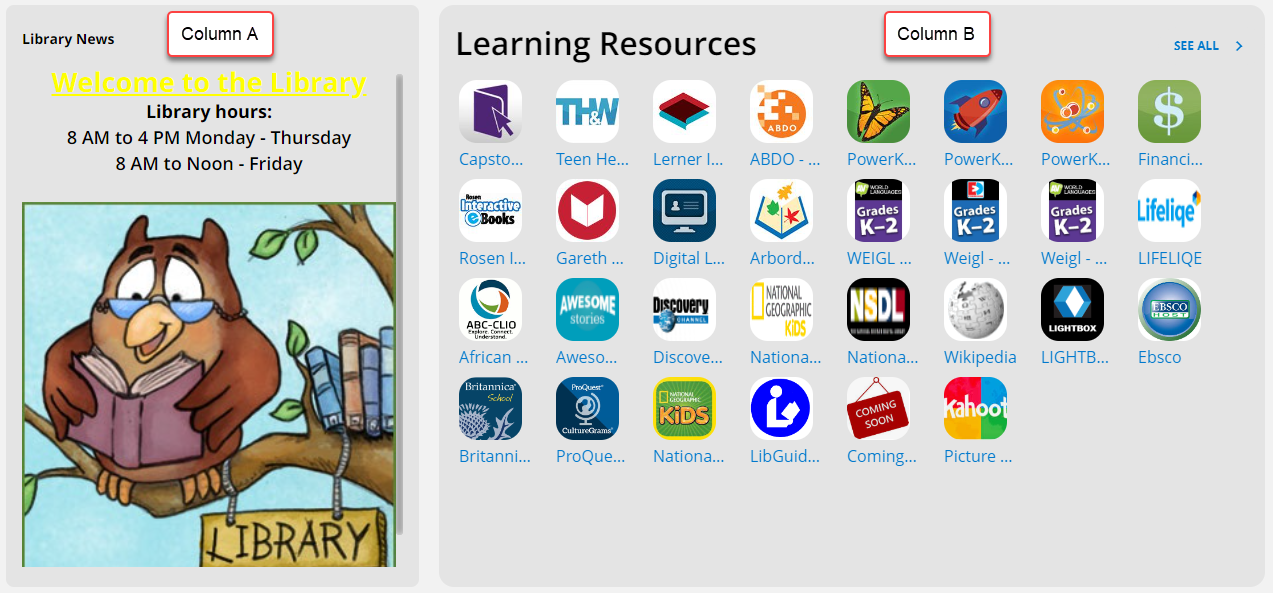
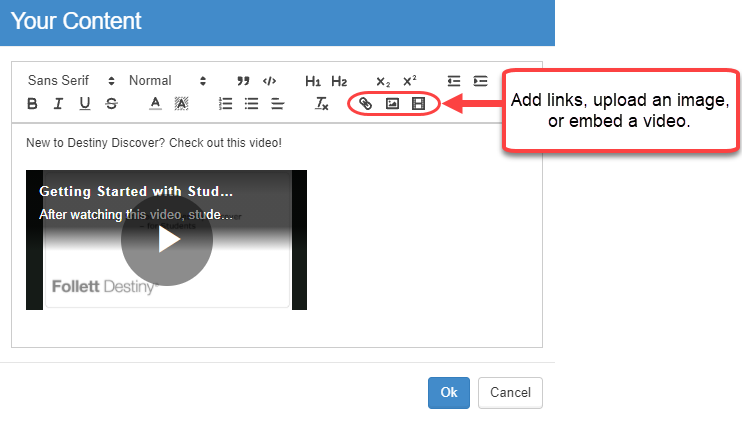
Add custom text, links, images, and videos
You can add content to the top of your Destiny Discover homepage to include text, images, videos, and/or links. This makes it easy to promote upcoming events and give one-click access to quality websites/databases.
|
Note: You can also add Learning Links as a Featured Content carousel. |
Column options include:
- Column A (optional): Use the content editor to add text, images, videos, and links.
- Column B (required): Choose one of the following:
- Use the content editor to add text, images, videos, and links.
- Add visual Learning Resources to include configured One Search™ databases and/or custom links.
To add, edit, or hide columns:
- Go to Discover Admin.
- Select Display Options > Featured Content.
- Use the Hidden checkbox to show or hide Column A. A preview of the layout appears on the right side of the page.
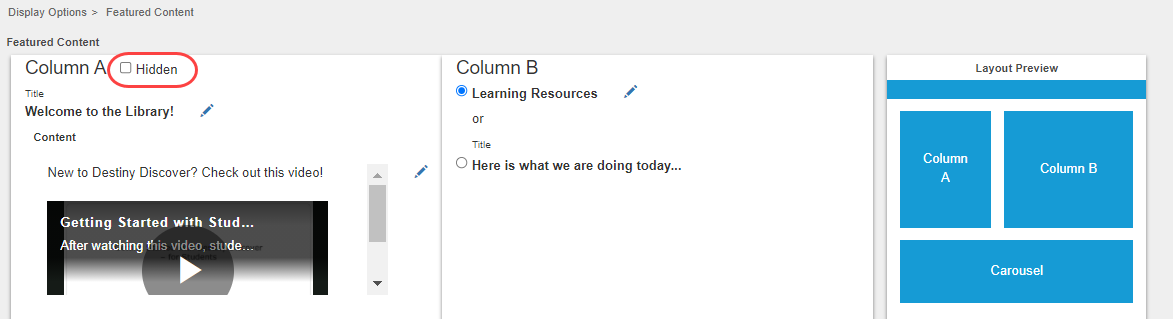
- To work with content in Column A:
-
To add Learning Resources or content in Column B:
- Do one of the following:
If you want to... Then... Add One Search resources and/or custom URLs Select the Learning Resources option. Add or edit a section of custom content (text, images, videos, links) Select the [title] option, and - If you selected the Learning Resources option, click
 to view the links, and then use the following table to determine your next steps:
If you want to... Then... Add a custom link
Note: If you want to include a link to a database, see Add a One Search Database.
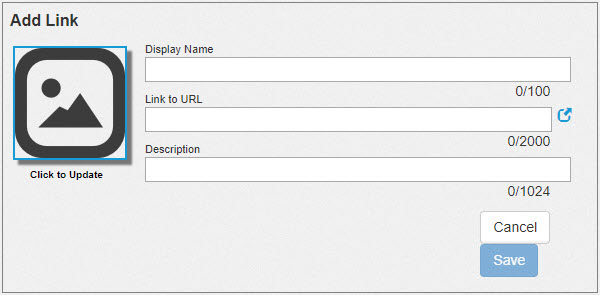
Click Add Link.
Type a Display Name. Type or paste a link in the Link to URL field. Type a Description (optional). - To add an image to show with the link, click the default image, and browse to an image file you have saved (optional).
- Click Save.
Edit a custom link - Next to the link you want to edit, click Edit.
- Edit any of the fields.
- Click Save.
Delete a custom link
Next to the link you want to delete, click Delete.
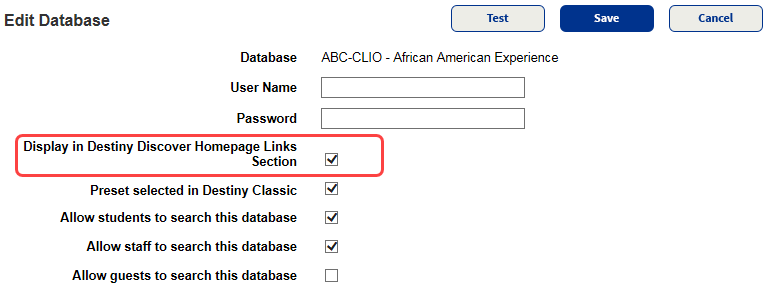
Add a One Search database One Search databases are configured in Destiny Library Manager. In order for a database to show in the Learning Links section, make sure the Display in Destiny Discover Homepage Links Section checkbox is selected in the One Search configuration for that database.
Note: For instructions on setting up One Search, see Destiny Help or Follett Community.
Hide a link Next to the link you want to hide, select the Hidden checkbox. - Click Done.
- Do one of the following:
- At the bottom of the Featured Content page, click Save.
Select Featured Content Carousels
- In the Destiny Discover header, select More > Admin.
Note: If you do not see the More drop-down, select
 > Admin.
 - Select Display Options > Featured Content.
- Select or deselect the carousels you want to show or hide on the Destiny Discover homepage.
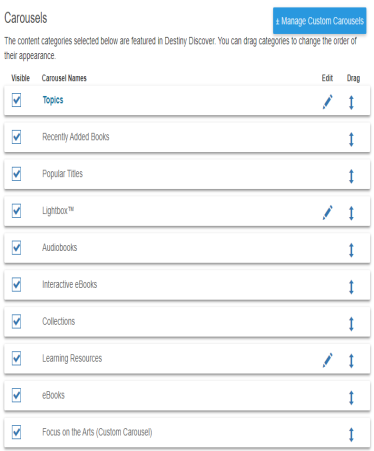
Notes:
- Carousels only appear on the homepage if they have content.
- You must enable a custom carousel to add resources to it. To
 .
.
- Click Save.
Determine the order of Featured Content Carousels
To determine the order of carousels on the Destiny Discover homepage:
- In the Destiny Discover header, select More > Admin.
Note: If you do not see the More drop-down, select
> Admin. - Select Display Options > Featured Content.
- Drag and drop any of the carousel buttons to change their order of appearance on the Destiny Discover homepage.
- Click Save.
Adjust circulation data in the Popular Titles Carousel
The Popular Titles carousel shows the top 10 books read in your collection by patron and material type.
To adjust the circulation data included in the Popular Titles carousel:
- In Destiny Back Office, select Admin > Site Configuration > Catalog sub-tab.
- In the Top 10 Titles section, do any of the following:
If you want to... Then... Include or exclude circulations identified as "in-library use"
Note: "In-library use" is an option you can select during checkout for materials that are used within the library.
Select or deselect the Count in-library use circulations checkbox.
Count circulations of only specific patron types
- Next to Count circulations of these patron types: [included patron types], click Update.
- Select or deselect the appropriate Patron Types.
- Click OK.
Count circulations of only specific material types
- Next to Count circulations of these material types: [included material types], click Update.
- Select or deselect the appropriate Material Types.
- Click OK.
Include circulations in a specific call number range
- Select the Count circulations of this call number range checkbox.
- In the From and to fields, specify a call number range. Type at least 3 digits of each Dewey number or a complete call number prefix.

- Click Save.
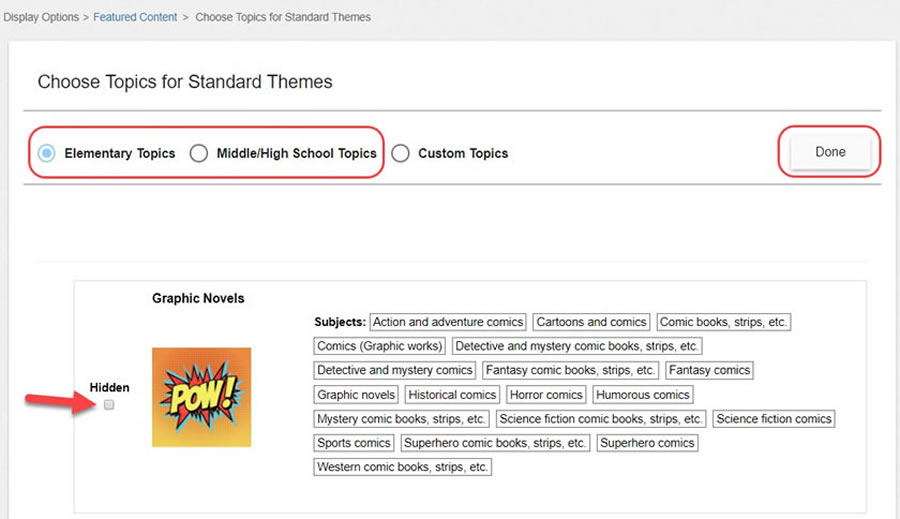
Choose topics to feature
Patrons can use the Topics carousel to search based on topic, genre, or keywords, such as Graphic Novels, Sports Fiction, or Summer Fun.
You can set up any combination of the following:
- Choose a preconfigured set of topics geared towards elementary or middle/high school students.
-
- Create your own topic to search by a subject, sublocation, or keyword.
- Edit a preconfigured topic.
|
Note: Clicking an icon in the Topics carousel mostly returns print and eBook titles. The following search is performed, based on resource type:
|
To use preconfigured topics:
- In the Destiny Discover header, select More > Admin.
- Select Display Options > Featured Content.
- On the Topics button, click .
- Select one of the following groups of topics:
- Elementary Topics
- Middle/High School Topics
- If you want to hide a topic, next to the one you want to hide, select the Hidden checkbox.
- Click Done.
To customize topics:
- In the Destiny Discover header, select More > Admin.
Note: If you do not see the More drop-down, select
> Admin. - Select Display Options > Featured Content.
- On the Topics button, click .
- Select Custom Topics.
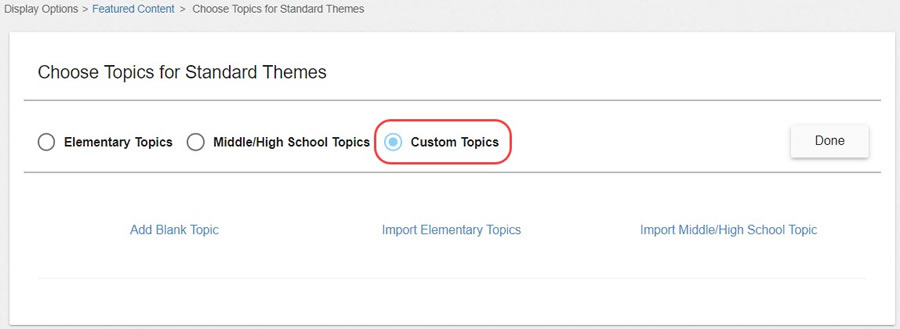
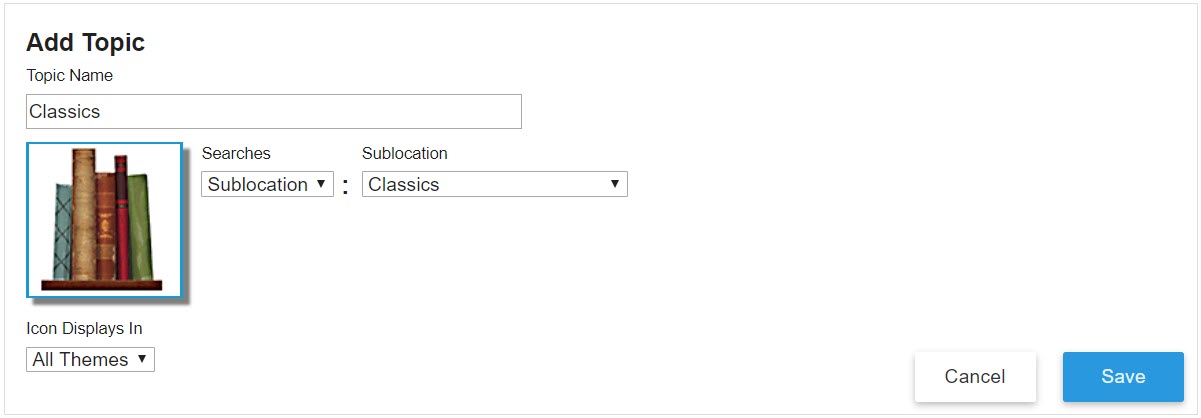
- To create a new topic:
- Click Add Blank Topic.
- In the Topic Name field, type the name you want to show in the Topics category.
- Click the No Image icon to select a stock icon or upload your own, and then click Accept.
- Do one of the following:
- To add a subject, from the Searches drop-down, select Subjects, type a name, and then click
 . You can add up to five.
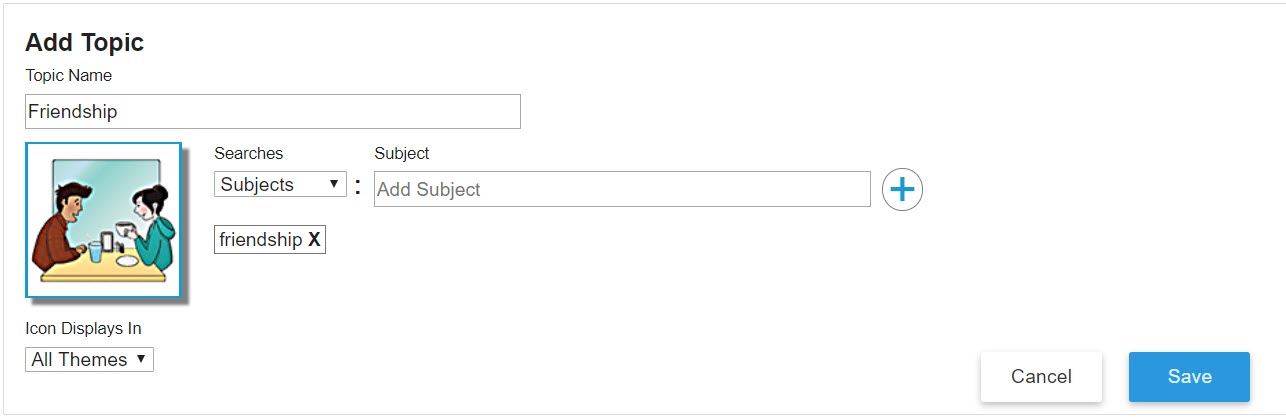
- To add a sublocation, from the Searches drop-down, select Sublocation, and then make your selection.
Note: Sublocation is a field in a book's copy record that is often used to organize a library by subject or genre. It might also be used to refer to an area in your library or building, such as a special shelving location, display cabinet, or classroom. For information on managing sublocations for your titles, see the Destiny Help Center.
- To add a keyword search, from the Searches drop-down, select Keyword, and then type your keyword(s).
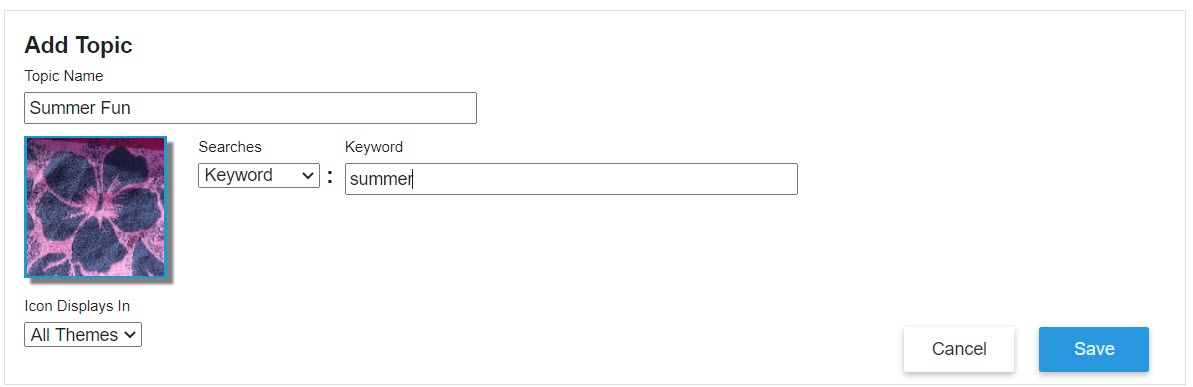
Note: You can use Boolean (AND, OR, NOT) searches.
- To add a subject, from the Searches drop-down, select Subjects, type a name, and then click
- Click Save.
Note: The Save button is not enabled until you add a Topic Name, image, and subjects, or sublocation search.
- To include any preconfigured topics:
- Select Import Elementary Topics or Import Middle/High School Topic.
- Select the checkboxes for the topics you want to include, and then click Import.
Notes:
- You can edit, duplicate, or delete any topic.
- When editing a topic, if it already has six or more subjects, you cannot add any more.
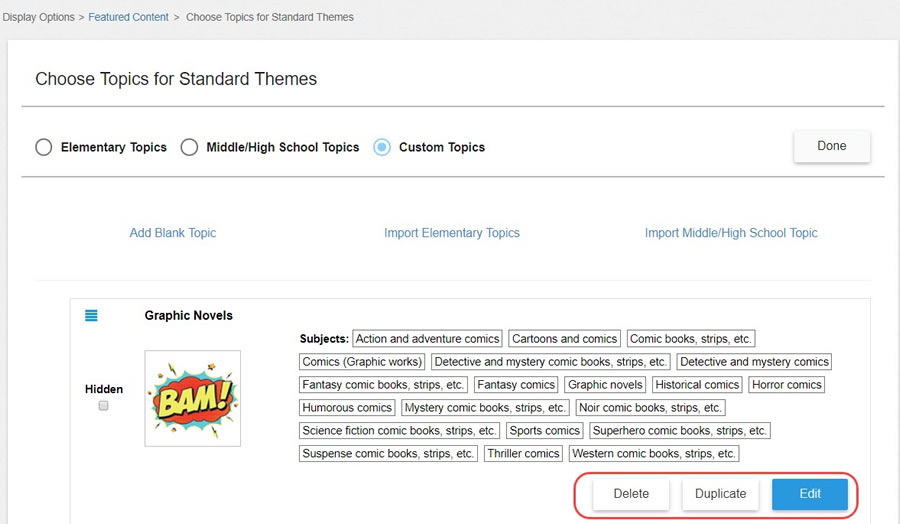
- To change the order of a topic, click the
 icon next to its name, and then drag it to another location.
 - Click Done.
Add content to the Custom Featured Content Carousel
Use the custom Featured Content carousel to create a virtual book display, including print and digital titles of your choice.
To customize the title of the custom carousel:
- In the Destiny Discover header, select More > Admin.
Note: If you do not see the More drop-down, select
> Admin. - Select Display Options > Featured Content.
- On the Custom Carousel button, click .
- Type a name, and then click Ok.
- At the bottom of the page, click Save.
To add resources to the custom carousel:
|
Note: To add resources to the custom carousel, you first need to |
From search results, Title Preview, or a title's details, click ![]() , and then Add to Carousel.
, and then Add to Carousel.
Note: Resources appear in the order they were added, from left to right. |
To remove a resource from the custom carousel:
- Search Destiny Discover for a resource you want to remove.
- From search results, Title Preview, or a title's details, click
 , and then Remove from Carousel.
Include a link to a Lightbox Subscription from the Lightbox Carousel
If you own Lightbox titles and have a Lightbox subscription, you can include both in the Lightbox carousel.
|
Note: The Lightbox carousel only shows if it is enabled and you own Lightbox titles. If you have a Lightbox subscription, but do not own any Lightbox titles, add a link to a subscription as a |
To feature a link to your Lightbox subscription in the Lightbox carousel:
- In the Destiny Discover header, select More > Admin.
Note: If you do not see the More drop-down, select
> Admin. - Select Display Options > Featured Content.
- On the Lightbox button, click .
- Type the Subscription URL.
- Click Save URL.
- At the bottom of the page, click Save.